
I recently purchased the flat 43″ Odyssey Neo G7 4K UHD 144Hz Gaming Monitor (S43CG70 / S43CG702NN / LS43CG702NNXZA) hardware Version No. AA01 / G70NC-S43CA0 (Version No is above S/N, see label near HDMI ports).

If you are new to screen calibration, it is a very important process for proper color reproduction.
The reasons for selecting this monitor:
- I love OLED but, as a daily computer monitor, I do not want to be burdened by OLED burn-in at a later date
- 144Hz refresh with variable refresh rate (AMD FreeSync Premium Pro)
- DisplayPort (a computer monitor) and HDMI inputs, as opposed to some screens (TVs) with HDMI only inputs
- Quantum Mini LED with 360 local dimming zones ( 20 horizontal by 18 vertical) is great for a non-OLED display getting a higher contrast ratio. So it gets the VESA DisplayHDR 600 certification. And not widely documented, this display has support for HDR10 and HDR10+. Other spec sheets state 1196 dimming zones (46 horizontal by 26 vertical). But given some basic tests, where I can count the zones, the count of 360 is the correct number.
The calibration process can be summarized as a way to set contrast, brightness, and RGB levels for proper color reproduction. A specialized device is used during this process. For a desktop OS, this can also create a custom Device Color Profile file (.icc).
For monitor calibration, I own an X-Rite i1Display (Pro) Plus, which is now known as a Calibrite ColorChecker Display Plus, and is one of the best out there.
After tweaking some menu settings, I ran an initial calibration, and was pretty happy with the results. I later watched a video by 1 Up Nerdcore on YouTube, which talks about OLED like performance and increased black levels on the flat 43″ Neo G7. This is mainly accomplished with combining the following settings:
Game > Dynamic Black Equalizer
Picture > Expert Settings > Local Dimming
Picture > Expert Settings > Contrast Enhancer
Picture > Expert Settings > Shadow Detail
After seeing this video, I decided to revisit as had not originally tweaked the Dynamic Black Equalizer setting.
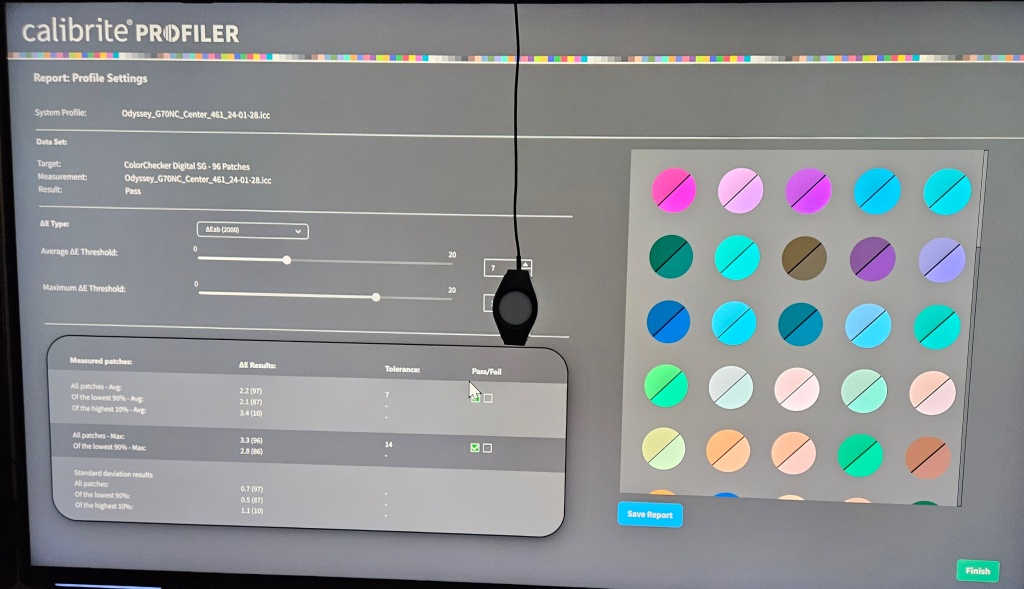
Below are the final settings, along with the .icc files (Device Color Profile). These were created using 461 color patch samples in Calibrite PROFILER software. The work includes both SDR and HDR calibration with target luminance of 120cd/m2.
This files have been installed on two other flat 43″ Neo G7 monitors also hardware Version No. AA01 / G70NC-S43CA0 (Version No is above S/N, see label near HDMI ports). Then tested with the Calibrite PROFILER software utility. This indicates the icc files are transferable to other screens of the identical model, including yours, providing you use the same settings outlined in the Settings section.
If you have different settings that you like, drop a comment below. If I like them too, I’d be happy to update and generate an icc file for that profile.
TIP: For HDMI and DisplayPort sources, on the Samsung remote, press the OK button (large round button inside the directional keys) will show the input source info at top right corner of screen, so you can determine if the signal on the display is SDR or HDR as follows. If this does not work but instead controls your input source via CEC, you can disable CEC temporarily on the input source to use this.
| 3840×2160 / 60p Input Signal Plus UHD <– Absence of HDR on this line means SDR |
| 3840×2160 / 60p Input Signal Plus HDR UHD |
| 3840×2160 FreeSync Premium Pro @144Hz Input Signal Plus UHD <– Absence of HDR on this line means SDR |
| 3840×2160 FreeSync Premium Pro @144Hz Input Signal Plus FreeSync HDR UHD |
Things of note during calibration:
Contrast setting: this is set to maximum and Calibrite PROFILER still wanted it higher.

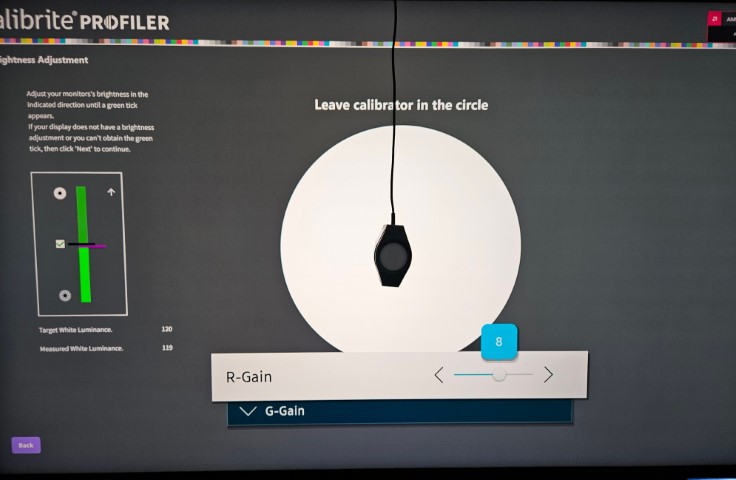
RGB settings: this monitor has solid Green and needs tweaks to boost Blue the most, followed by some extra Red. The picture below was while I was hitting Next and Back to in order to verify brightness levels with different RGB Gain values.

Brightness setting: changing by plus or minus one has a significant effect on brightness. The RGB levels provide a way to offset this and get very close to perfect brightness. This is the reason I was hitting Next and Back in order to find the sweet spot on this.
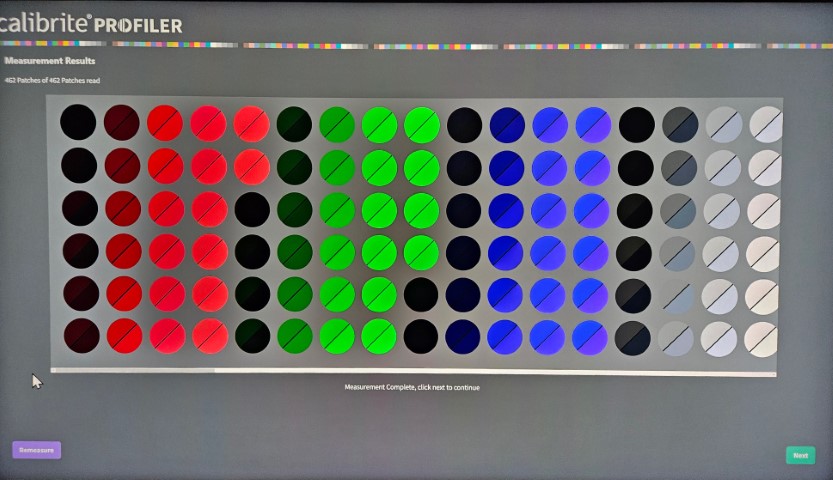
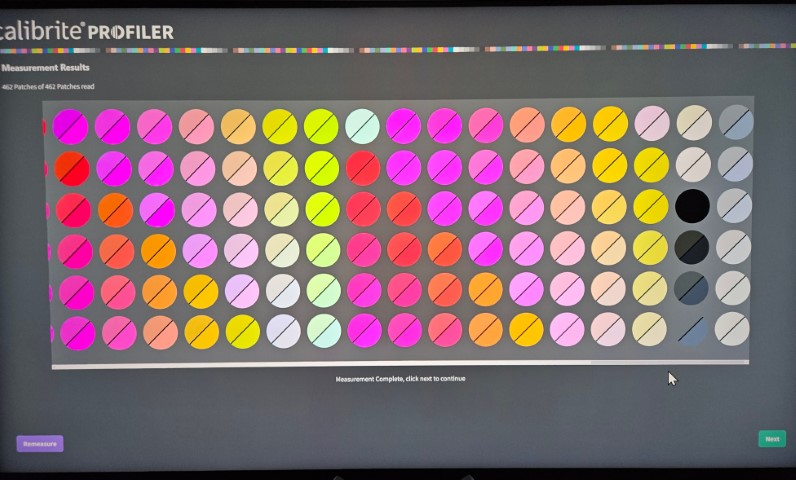
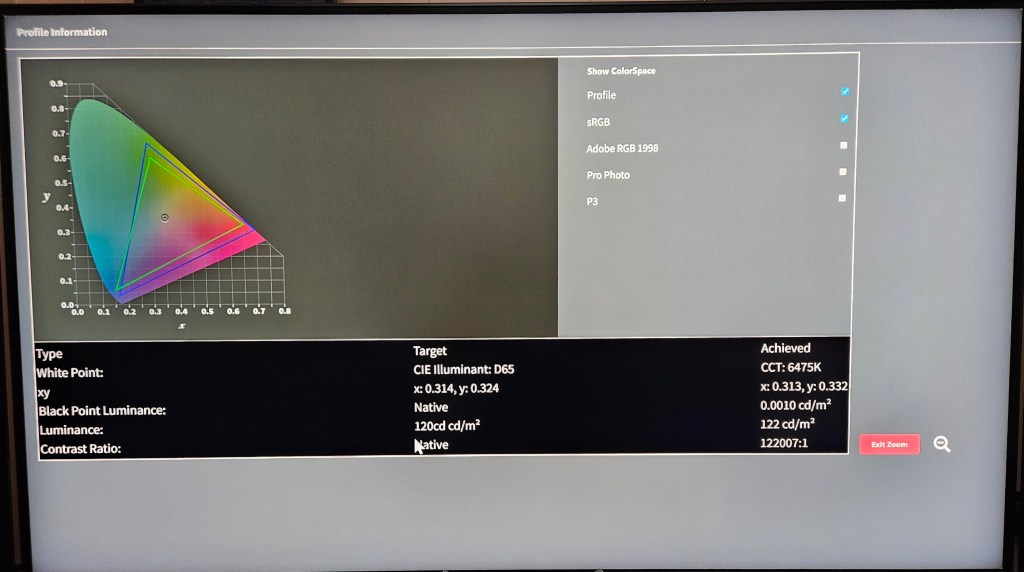
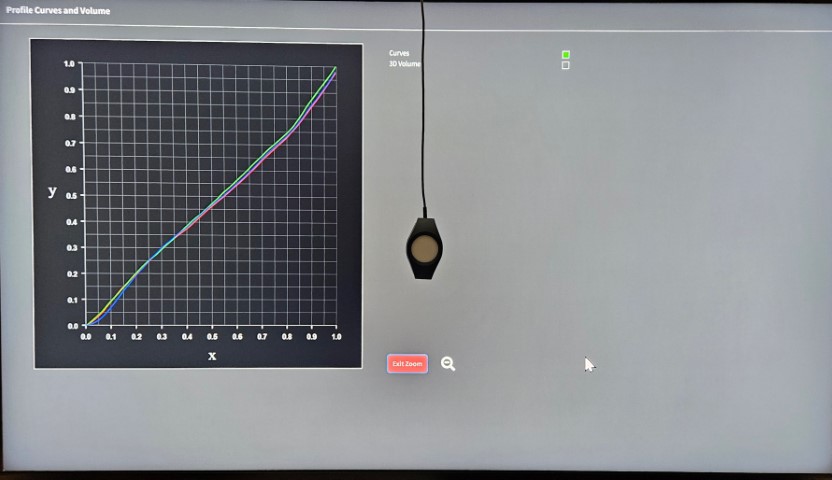
After 461 color patches the before and after show this is really important to get true to life colors on this monitor. Two screenshots to demonstrate:
I am not an expert on how to read these charts, and welcome your comments on how you interpret them:
Profile 1 SDR results

Profile 1 HDR Results

POTENTIAL PROBLEMS: If after applying these settings your result has a noticeable color bias issue (e.g. screen appears too green or too blue) apply all settings but exclude White Balance > 2 Point and test with and without the icc files. You will likely find all other settings are beneficial for the proper performance of your display.
For nVidia graphics cards, if you run more than two screens, the Variable Refresh Rate (VRR) will prevent the third screen from displaying. This does not occur with AMD graphics cards. For nVidia, this can be solved by disabling VRR using the on-screen-display, under the Game settings (see below). This also forces HDR to gamma ST.2048 and limits the display to max refresh of 120Hz instead of 144Hz. If you have disabled Game mode, for SDR (gamma 2.2), you can still use Profile 1. However, for HDR (ST.2048) you should use Profile 3.
Game (SDR and HDR)
Game = Off (forces VRR off)
Response Time = Extreme
SETTINGS for DisplayPort input:
Following are the settings in text and picture form.
IMPORTANT: The NEO G7 will store SDR and HDR on-screen-menu settings (Brightness, etc.) for the input (e.g. DisplayPort) independently. Therefore, with the input device (e.g. Windows 11) set to SDR (HDR off), follow the on-screen-menu steps from start to finish.

Then with the input device set to HDR On, follow the steps from start to finish again.
Once completed, when you toggle HDR on or off, those appropriate NEO G7 menu settings will update automatically as well as the configured icc profile.
Profile 1 SDR 120cd/m2 (20240202) HDR 120cd/m2 (20240206)
General & Privacy > Power and Energy Saving
Brightness Optimization = Off (black, not blue)
Brightness reduction = Off (black, not blue)
Motion Lighting = Off (black, not blue)
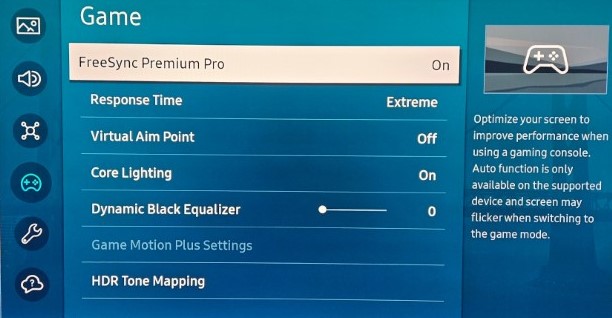
Game (SDR and HDR)
Game = On
FreeSync Premium Pro = On
Response Time = Extreme
Dynamic Black Equalizer = 0
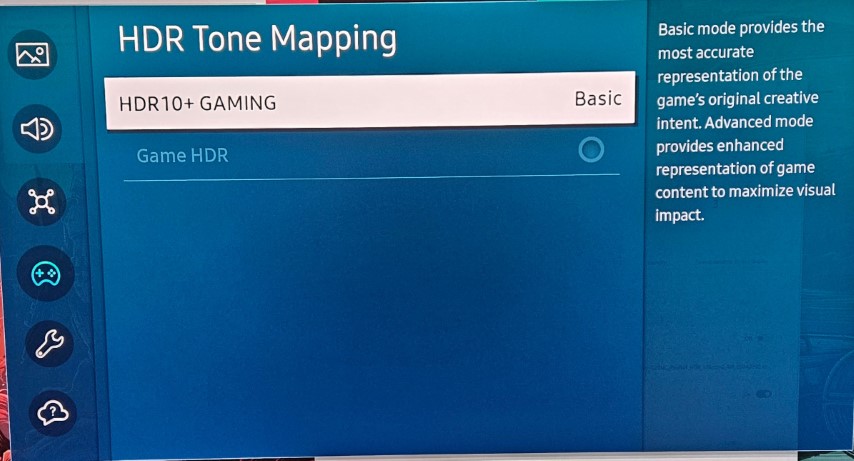
HDR Tone Mapping > HDR10+ GAMING = Basic
Picture > (SDR and HDR)
Picture Mode = Standard
Picture Size = 16:9
Fit to Screen = On
Picture > Eye Care (SDR and HDR)
Eye Care = Off
Adaptive Picture = Off (black, not blue)
Picture > Expert Settings (SDR)
Reset Picture > Reset
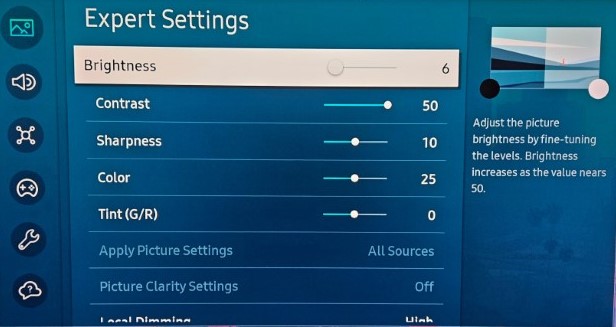
Brightness = 6 (120 cd/m2)
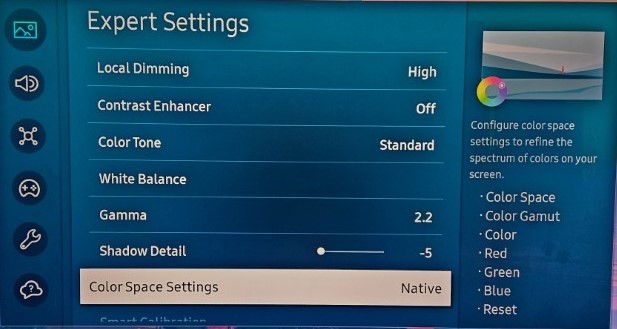
Shadow Detail = -5
Picture > Expert Settings (HDR)
Reset Picture > Reset
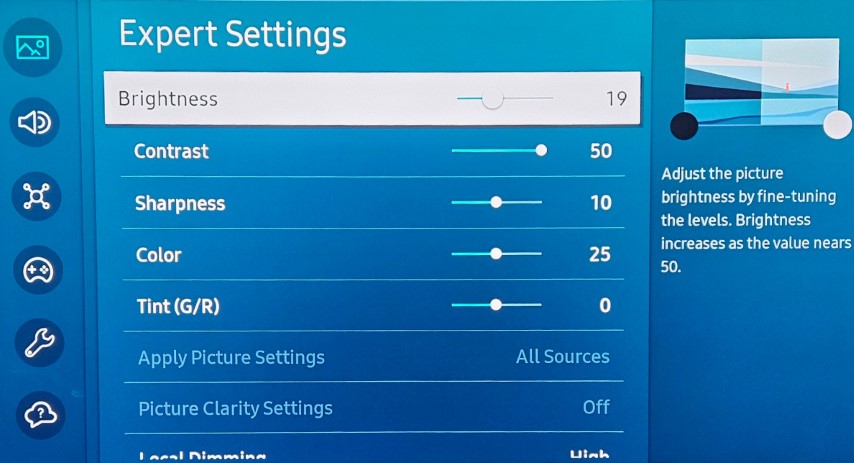
Brightness = 20 (120 cd/m2)
Shadow Detail = -3

Picture > Expert Settings (SDR and HDR)
Contrast = 50
Sharpness = 10
Color = 25
Tint (G/R) = 0
Local Dimming = High
Contrast Enhancer = Off
Color Tone = Standard
White Balance (see next section)
Gamma = 2.2 (if your Gamma is set to ST.2048, you may need to also follow Profile 3)
Color Space Settings = Native
VRR Control = On
White Balance > 2 Point (SDR)
R-Gain = 8
G-Gain = 0
B-Gain = 12
R-Offset = 0
G-Offset = 0
B-Offset = 0

White Balance > 2 Point (HDR)
R-Gain = 14
G-Gain = 0
B-Gain = 20
R-Offset = 0
G-Offset = 0
B-Offset = 0

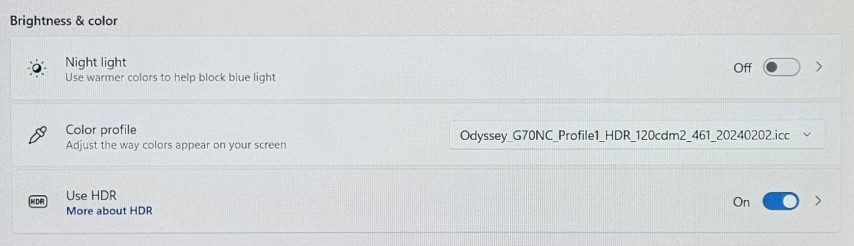
Windows 10 and Windows 11, the Color Profiles are set under Color Management (click Start and type Color Management). It can also be opened from the GPU Properties, under the Color Management tab.
Click Add… and Browse to the icc file location. For adding the HDR icc file also select Add as Advanced Color Profile. Finally for the SDR and HDR icc file click Set as Default Profile and click Close.

Once set, verify Under Display Settings. Here you can toggle HDR On or Off and the appropriate icc file will be set.
To the right side of the Use HDR toggle, clicking on the > will take you to the HDR configuration. Optionally you can set Auto HDR = On.

Last but not least:
- Set Microsoft Windows Night light = Off, unless you want a lower blue level (more yellow) at night. To open, click start, type Night light
- In the event you were tinkering before, you need to disable any iGPU / dGPU color correction and signal limiting features:
- Intel Graphics Command Center > Video >
- Video Profiles = Default / Restore to Original Settings
- AMD Adrenalin Edition > Gaming > Display >
- Color Depth = 10bpc
- Pixel Format = RGB 4:4:4 Pixel Format PC Standard (Full RGB)
- Custom Color = Disabled
- Color Deficiency Correction = Disabled
- NVIDIA Control Panel
- Display > Change resolution > Use NVIDIA color settings
- Desktop color depth = Highest (32bit)
- Output color depth = 10bpc
- Output color format = RGB
- Output dynamic range = Full
- Video > Adjust video color settings > How do you make color adjustments = With the video player settings
- Display > Change resolution > Use NVIDIA color settings
- Intel Graphics Command Center > Video >
Optionally, on Microsoft Windows, disable Windows display calibration.
- Start > Color Management
- Advanced > Change systems defaults
- Advanced > Use Windows display calibration = unchecked
- Advanced > Change systems defaults
(End of Profile 1)
Profile 2 HDR MAXcd/m2 (20240212)
I do not recommend this profile for a desktop operating system like Microsoft Windows. This profile was created in order to calibrate White Balance (2 Point), with Brightness set to max (50). Follow Profile 1 for all settings, plus apply the following items…
Picture > Expert Settings (HDR)
Brightness = 50 (MAX cd/m2 very important to achieve the VESA DisplayHDR 600 spec. Netflix Series “You” is especially dark and makes excellent use of HDR)
Shadow Detail = -3
White Balance > 2 Point (HDR)
R-Gain = 19
B-Gain = 21
(End of Profile 2)
Profile 3 HDR 120cd/m2 (20240407)
This profile is for gamma ST.2048. It isn’t perfected yet and still experimenting.
Picture > Picture Mode > Graphic (HDR)
Picture > Expert Settings (HDR)
Brightness = 20
Contrast = 30
Color = 25
Local Dimming = High
Contrast Enhancer = off
White Balance (see below)
Gamma = ST.2084 (and set to 0)
Shadow Detail = -5
White Balance > 2 Point (HDR)
R-Gain = 14
B-Gain = 17
(End of Profile 3)
Download links for custom Display Color Profile (.icc) files, firmware, and drivers:
Profile 1 (461 patches) odyssey_g70nc_profile1_sdr_hdr_120cdm2_461_20240210.zip
Profile 2 (461 patches) odyssey_g70nc_profile2_hdr_maxcdm2_461_20240212.zip
Profile 3 (461 patches) Odyssey_G70NC_Profile3_HDR_120cdm2_461_20240407e.icc
Samsung Support for USB firmware and G70C_SxxCG70x (VRR) Monitor Driver Installer
Affiliate link for USD flat 43″ Samsung Neo G7 / CAD https://amzn.to/48URoSs
Affiliate links for Calibrite models if you want to buy one:
Calibrite ColorChecker Display SL
Calibrite ColorChecker Display Plus <– This is the model I own
Calibrite ColorChecker Display Pro
Calibrite ColorChecker Display Pro HL
Calibrite ColorChecker Display Plus HL
There are lots of videos on YouTube that do a really nice job of highlighting the color, contrast, and RGB of this monitor. Here are some that are really, very nice which you might enjoy on this monitor, after calibrating.
Note: As of this writing Firefox v.122.0 still does not support HDR, whereas browsers like Google Chrome and Microsoft Edge do.
Notes on desktop operating systems like Microsoft Window and HDR:
Support for HDR on Microsoft Windows remains incredibly bad. In that the OS and apps are tuned for SDR with respects to brightness. 120cd/m2 remains the normal viewing experience and cannot be achieved without lowering the display brightness. The majority of streaming services are limited to SDR, many of which limit to FDH also. For services capable of streaming HDR on Microsoft Windows, Netflix are properly utilizing HDR. If brightness is tuned to 120cd/m2 all HDR content on Netflix is incredibly dark. Whereas UHD HDR content on YouTube, on a supported browser (e.g. Microsoft Edge, Google Chrome) is limited to content from Channel creators and excludes movies. This is generally a much brighter content in comparison and displays wellwhen brightness is tuned to 120cd/m2. Microsoft Windows lacks the ability to change between SDR and HDR based on the displayed content (full screen). For the always on HDR mode at present, it’s a shame Microsoft have not introduced features that allow for setting to the maximum brightness, whilst maintaining 120cd/m2 on the SDR elements of the user interface and applications.
It is for these reasons that I recommend against using desktop operating systems, like Microsoft Windows, as a home theater PC (HTPC) for high quality movie streaming. In addition, for Microsoft Windows with HDR enabled, I recommend against setting the brightness to the display’s maximum (Profile 2).
If HDR enabled on Microsoft Windows, and using Netflix, the following options exist:
- Use Windows store Netflix app and temporarily set screen brightness = 50. If set permanently to 50, eye strain will be high for other apps like web browsing. Suggest set Microsoft Windows Theme Colors to Dark preset.
- Use Windows store Netflix app and System > Display > HDR > HDR video streaming = Off. This forces Netflix to stream SDR whilst preserving ability to stream UHD.
- Only enable HDR (using Profile 2) when watching HDR content on Netflix and YouTube.
- Do not use Windows store Netflix app and instead use Microsoft Edge (or Google Chrome) and install as a Progressive Web App (PWA) by clicking three dot menu > Apps > Install. This comes at the compromise of content being limited to SDR at FHD.
SETTINGS for Smart TV apps and HDMI input (e.g. Roku):
TIP: For HDMI and DisplayPort sources, on the Samsung remote, press the OK button (large round button inside the directional keys) will show the input source info at top right corner of screen, so you can determine if the signal on the display is SDR or HDR as follows. If this does not work but instead controls your input source via CEC, you can disable CEC temporarily on the input source to use this.
| 3840×2160 / 60p Input Signal Plus UHD <– Absence of HDR on this line means SDR |
| 3840×2160 / 60p Input Signal Plus HDR UHD |
| 3840×2160 FreeSync Premium Pro @144Hz Input Signal Plus UHD <– Absence of HDR on this line means SDR |
| 3840×2160 FreeSync Premium Pro @144Hz Input Signal Plus FreeSync HDR UHD |
Slightly different view is seen on the Control PAD menu (long press Home button on remote) which provides an on-screen overlay at the bottom of the screen. Press the up or down arrow to navigate between three menus (Settings, Numbers, Colored buttons). Sixth item from the left is called Picture Mode. When not in Game Mode, this will display three possible titles over a double white circle logo.

| Format | Smart TV App | Show |
| SDR | Netflix | Roswell New Mexico |
| HDR10 | Netflix | The Umbrella Academy |
| HDR10+ | Apple TV+ | Monarch |
HDR10+ is in use, for some content, on the following streaming platforms: Apple TV+, YouTube, Hulu, Paramount+, Prime Video, Rakuten TV, Tving, Watcha, Megogo, Magenta TV. Source: https://hdr10plus.org/
Interesting article on HDR10 vs HDR10+ here: https://history-computer.com/hdr10-vs-hdr10/
TIP: To disable Samsung TV Plus integration: From Home screen Media Apps shortcuts, long press Samsung TV Plus, select Remove, from next screen select Disable. Samsung TV Plus is now removed from the Smart TV interface.
Following are the settings in text form only.
IMPORTANT: The NEO G7 will store SDR and HDR on-screen-menu settings (Brightness, etc.) independently due to on-the-fly changing to match the native streaming source.
Therefore, with the input device (e.g. Roku) displaying SDR (e.g. Netflix > Roswell New Mexico), follow the on-screen-menu steps from start to finish. For HDMI sources, see TIP above for how to check if the format is SDR or HDR.
Then with the input streaming HDR content (e.g. Netflix > Umbrella Academy), follow the steps from start to finish again.
Once completed, when you watch content in either SDR or HDR, those appropriate NEO G7 menu settings will update automatically.
I tested with a Chromecast Google TV. Setting up with a Roku would be the same. I didn’t test a game console and welcome comments.
Follow Profile 1 for all settings, plus apply the following items…
Game (SDR and HDR)
Game = Auto (or off)
Picture (SDR and HDR)
Picture Mode = Standard
Picture > Expert Settings (SDR and HDR)
Apply Picture Settings = All Sources
Picture Clarity Settings = Off (eliminates soap opera effect)
Picture > Expert Settings (HDR)
Brightness = 50 (MAX cd/m2 very important to achieve the VESA DisplayHDR 600 spec. Netflix Series “You” is especially dark and makes excellent use of HDR)
Shadow Detail = -3
Gamma = SD.2084 (locked and cannot be changed)
SETTINGS for Chromecast with Google TV:
This is a great little device with some things to be aware of. The Chromecast has the option to have HDR forced on and suggest to disable so that display only uses HDR settings for HDR content. In addition, each streaming app will have individual HDR streaming settings, which might need to be changed. e.g. Amazon’s Prime Video allows you to configure use of HDR (Settings > Video). It should automatically change, based on the stream, after streaming an HDR show (e.g. Upload), it will revert back to SDR for streaming SDR content (e.g. Chuck).
Settings > Display & Sound
HDMI-CEC = On
Resolution = 4K 60Hz
Match content frame rate = Non-seamless
Settings > Display & Sound > Dynamic range & Color format
Dynamic range format preference = HDR
Match content dynamic range = Match content
Color format = YCbCr 4:2:2 12-bit
COMMENTS and FEEDBACK:
If you post comments, can you also include the following info:
- NEOG7 version number (Version No is above S/N, see label near HDMI ports), e.g. AA01 / G70NC-S43CA0
- SDR or HDR
- Name of OS, e.g. Windows 11
- Connected by DisplayPort or HDMI
- Make of GPU, e.g. integrated Intel, integrated AMD, discrete GPU like RX6600, RTX2080, ARC770
Feedback received (updated 20240208):
1 report, Windows 11, SDR good, HDR too green, NEOG7 version unknown, unknown cause
1 report, unknown OS, good (SDR?), NEOG7 version unknown, no issues
1 report, Mac Studio M1 Max, SDR too blue, USB C to DP, NEOG7 version AC03, unknown cause


Leave a reply to 강철중 Cancel reply